How to Build an eCommerce Website – A Step-by-Step Guide
Are you planning to build an eCommerce website for your online business? If you have no idea where to begin, keep reading this article. In the previous article, we discussed the benefits of eCommerce and why it is important for your business. Here we will discuss how to build an eCommerce website from scratch. After reading this article, you will be able to build an eCommerce website for your business.
From small businesses to big enterprises, today every company wants to have an eCommerce website. If you have a business of products and services, you need to get an eCommerce store to sell them over the internet. With an online store, you will not only increase your sales and revenue but also expand your business all over the world. But the question is – how to build an eCommerce website or an eCommerce store. If you are a website beginner, it may not easy for you to build an eCommerce store. Because it takes a lot of knowledge and hard work as well. So what if you have no web designing knowledge. Not to worry. We are here to help you.
How to Build an eCommerce Website?
An eCommerce website is not like a regular website, it is a bit different. You build a regular website to share information over the internet. On the other hand, an eCommerce website offers products and services and makes online payments over the internet. However, most of the steps are the same. Since building a new eCommerce website is a lengthy process, we are dividing it into multiple parts so it becomes easy to understand and follow:
- Choosing the Right CMS Platform
- Choosing the Domain Name and Hosting Provider
- Installing WordPress
- Setting Up Your Site
- Setting Up Your Online Store
- Adding Products
- Customizing Your Website Theme
- Adding New WordPress Plugins
So let’s start building an eCommerce website for your business.
Step 1 – Choosing the Right CMS Platform
Whenever you are creating a website, choosing the right CMS platform is very important. If you are building your eCommerce store, you have two best options – WordPress and Shopify. Here we would suggest you build an eCommerce website on WordPress. Although Shopify is also a good option, WordPress is the best. In one of the previous articles, we have already discussed why WordPress is better than other CMS.
Step 2 – Choosing the Domain Name and Hosting Provider
After choosing the right platform for your first eCommerce store, you have to choose the right domain name and then the hosting provider. Remember, the domain name you choose will be the web address of your eCommerce website. So you have to choose the right domain name that suits your business most. After choosing the domain name, you have to register it so no one else can get it.
Once you have the domain name, you need to buy web hosting for your website. Web hosting is an Internet hosting service that makes your website accessible through the world wide web. Without using a web host, nobody can access your website on the internet. It is used as a storage space that allows you to store all the files of your website on a web server.
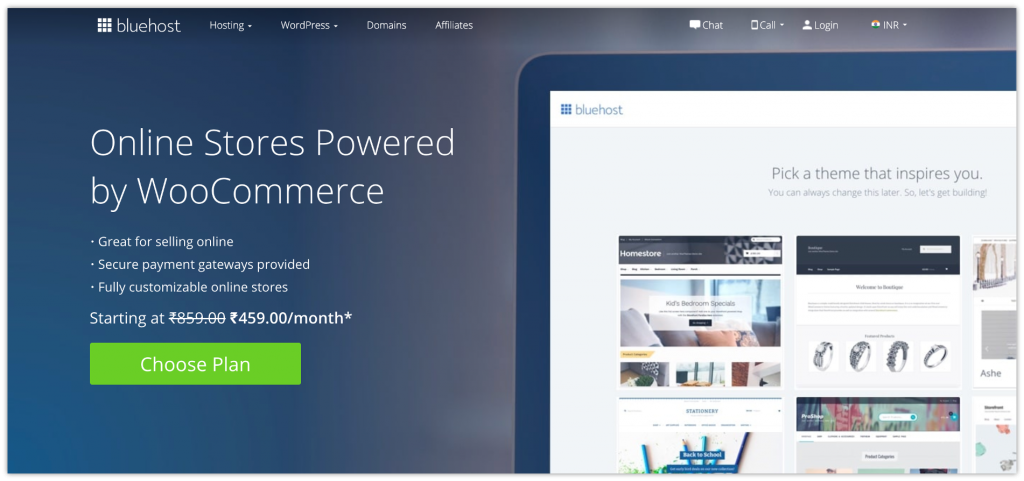
A reliable and high-performing web hosting service is very important for your eCommerce website to perform well. BlueHost is one of the highly recommended hosting services for WordPress websites. It has a dedicated web hosting service for an eCommerce platform, called WooCommerce hosting. WooCommerce WP plugin and Storefront Theme come pre-installed with this web hosting service. You can refer to this article for some useful information – How to Get a Domain Name and Hosting for WordPress Website.
Step 3 – Installing WordPress
After buying the web hosting service for your website, you need to install WordPress on your system. If you choose Bluehost web hosting, you can install WordPress directly from Bluehost. It makes WordPress installation easier. You can also install WordPress manually. With the manual option, you need to set up the server manually. Manual installation is a lengthy process. So if you are a beginner, we would recommend you choosing Bluehost web hosting service. It has an auto-installation of WordPress. Refer to this article for some useful information – WordPress Installation Guide.
Step 4 – Setting Up Your Site
Once WordPress installation is completed, you need to set up your eCommerce website. Firstly, log in to the admin page of your website. The WordPress dashboard welcome screen that will appear is shown below:
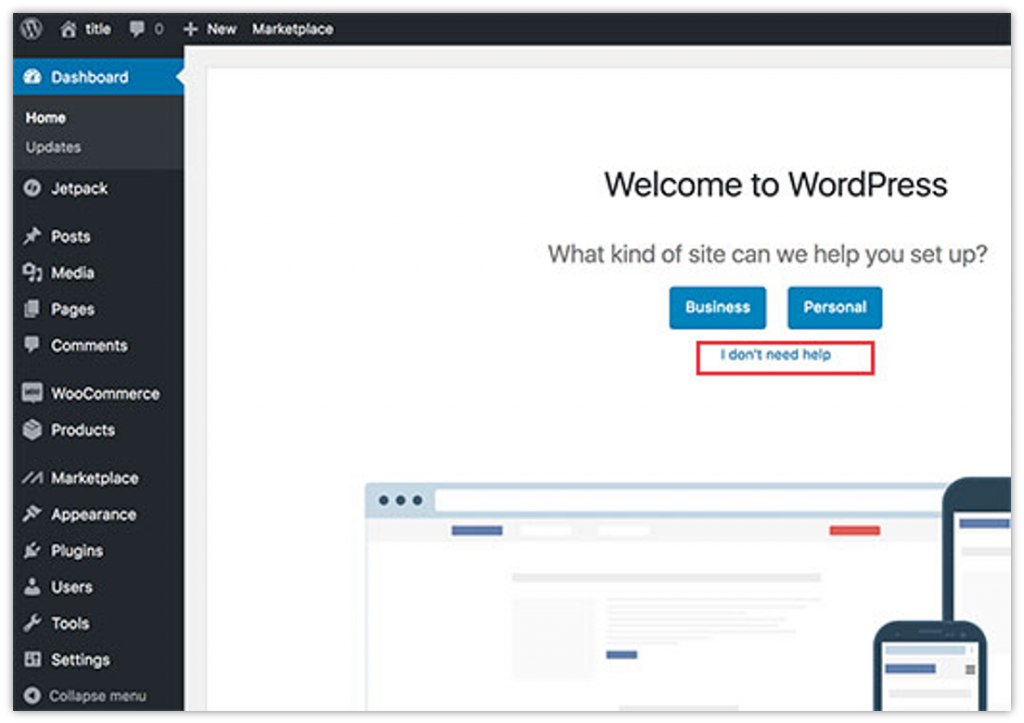
Since we will help you throughout the entire set up process, you can click the “I don’t need help” link. Before you can run the setup wizard, you need to define the general settings.
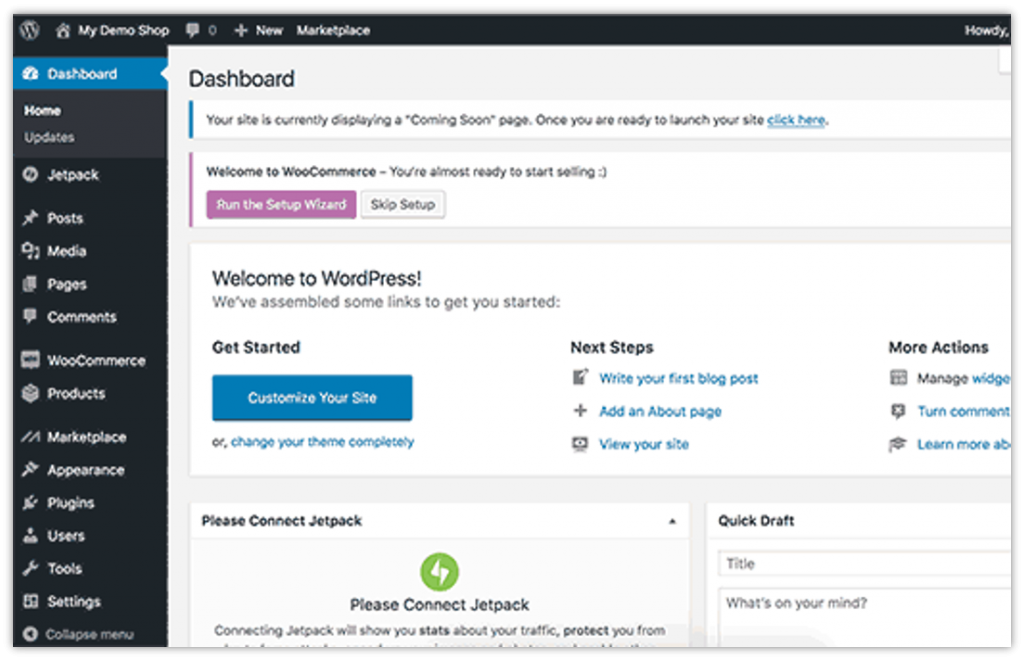
Click the Settings in the dashboard menu, and select General to define title and description for your website.
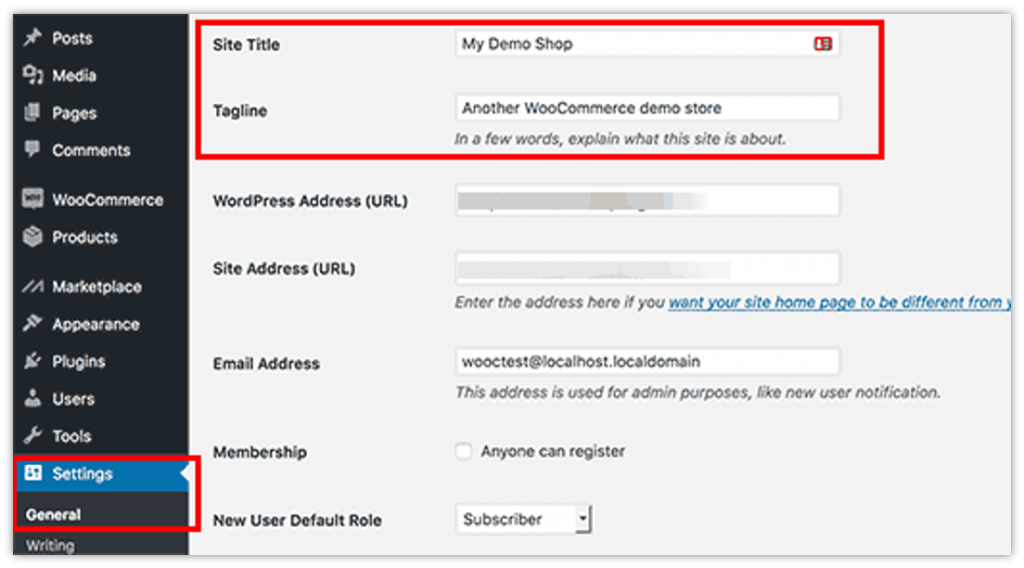
Now you need to set up HTTPS to use SSL (secure sockets layer). Although the Bluehost eCommerce hosting package comes with a free SSL certificate, you need to configure it for your WordPress site. Go to Settings on the dashboard menu, and select General. Now replace HTTP with HTTPS in your WordPress address (URL) and site address (URL).
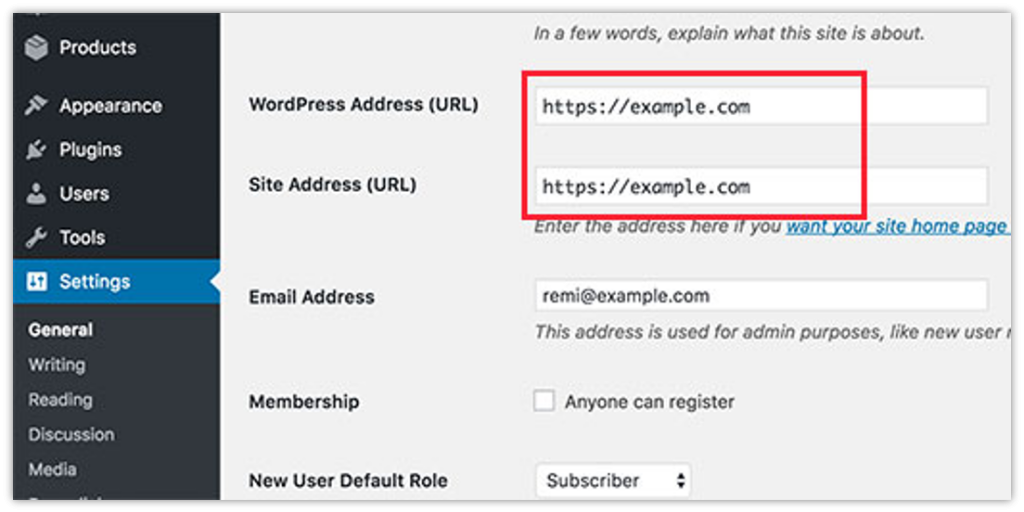
After that, you need to save the changes you made in WordPress’s basic settings. The basic WordPress setup is completed, and now you can set up your online store.
Step 5 – Setting Up Your Online Store
Before you can start selling your products, you need to set up a few things like currency, payments, and shipping information. If you have chosen the Bluehost eCommerce hosting service, it has the WooCommerce plugin auto-installed. And if you have chosen the regular hosting service of Bluehost, then you have to manually install the WooCommerce plugin. It is free. You can get it from the WordPress official plugin directory. Once the WooCommerce plugin is ready to use, you need to run the setup wizard.
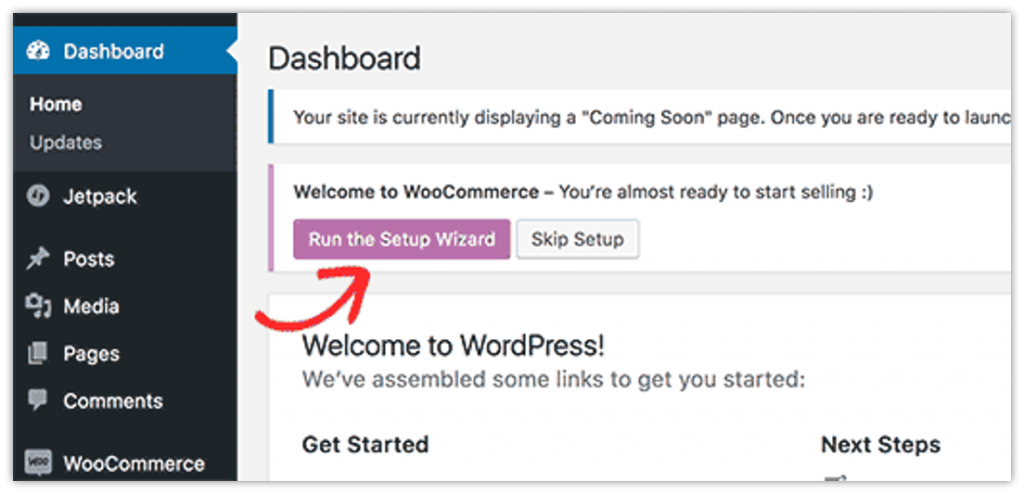
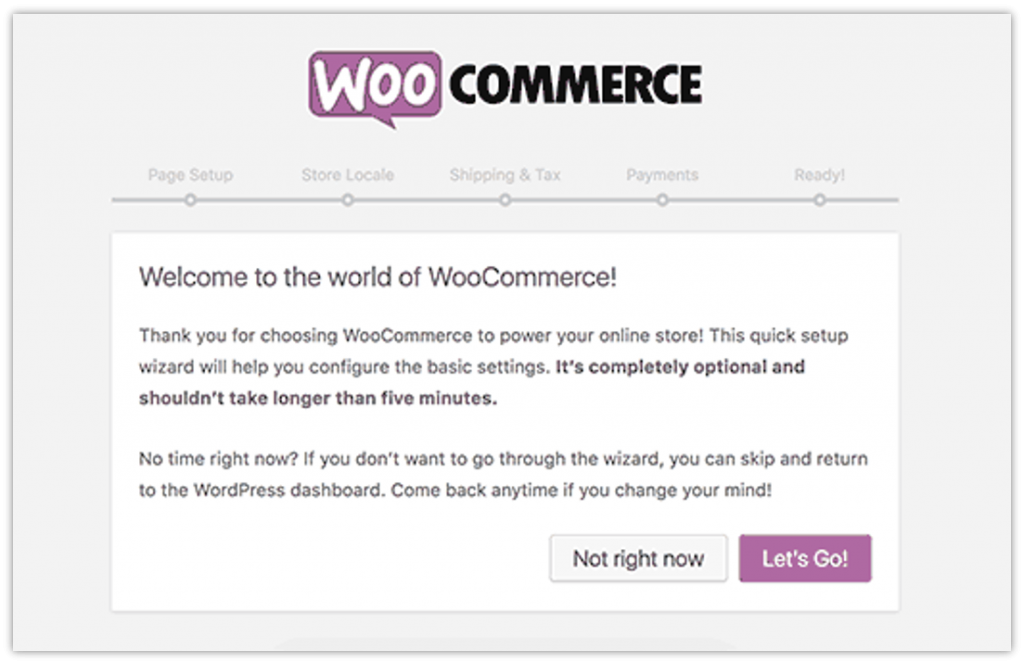
By clicking the Run the Setup Wizard button, the WooCommerce Setup Wizard will appear. Click Let’s Go!
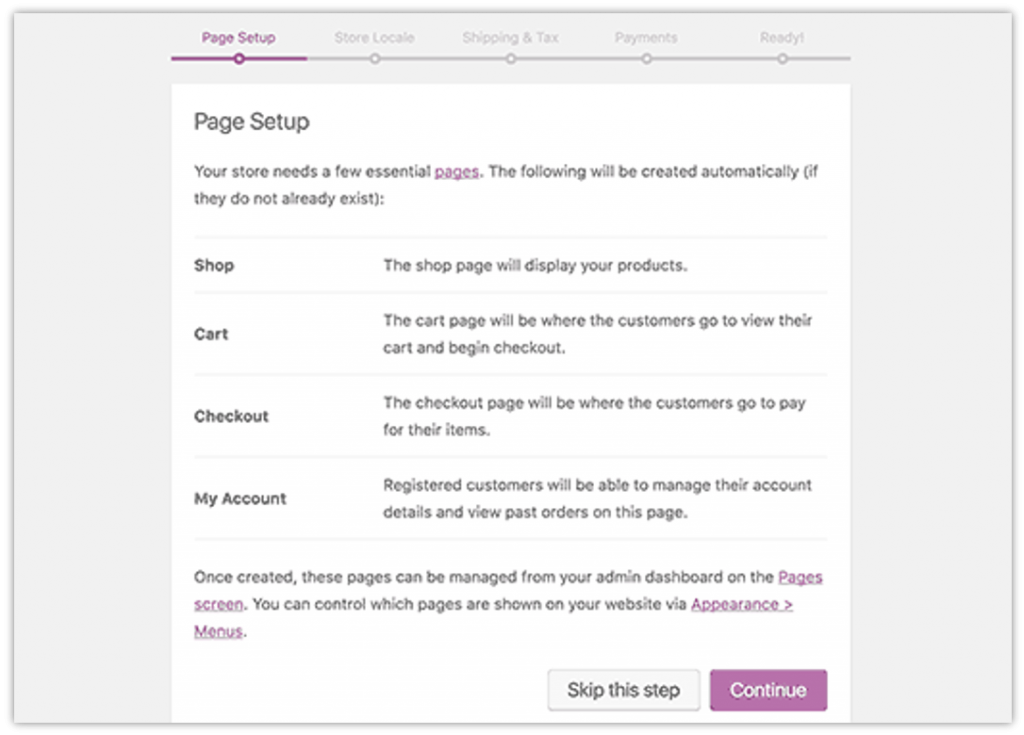
The first tab is the Page Setup. Your online store needs a few essential pages – Shop, Cart, Checkout, and My Account. Click Continue.
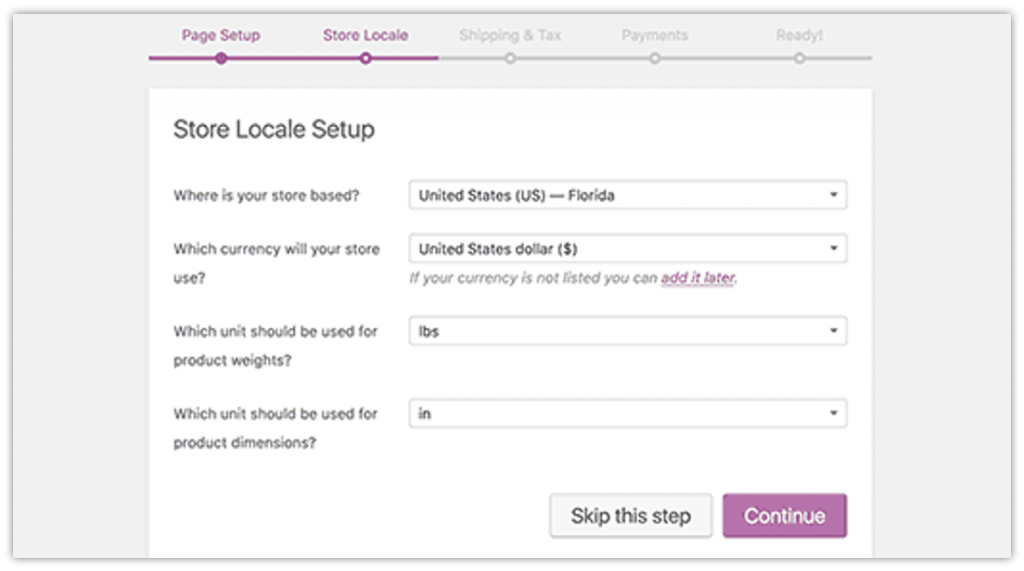
On the Store Locale tab, select store location, currency, and unit measures. Click Continue.
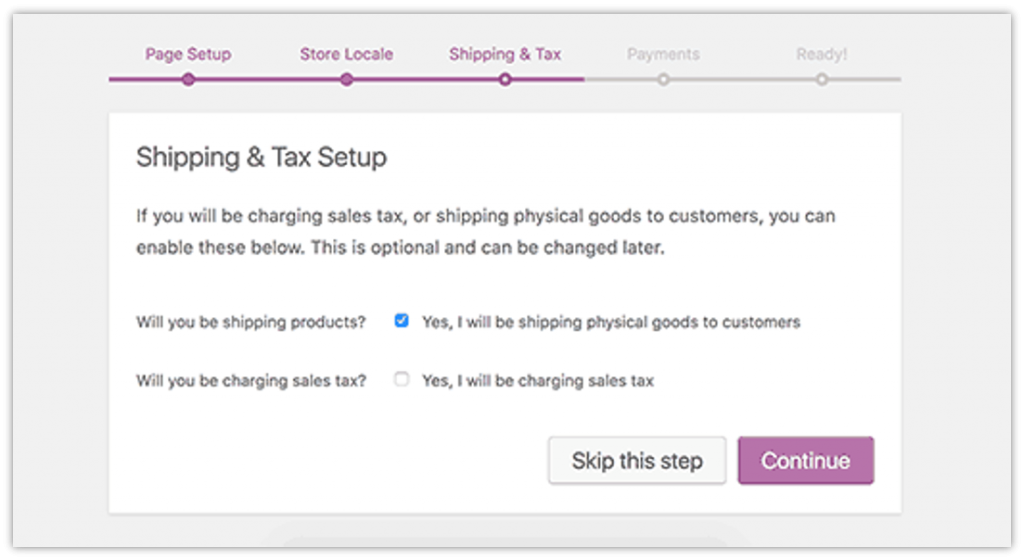
On the Shipping & Tax tab, enter shipping and tax information. If you will be charging sales tax, or shipping physical goods to your customers, you can select the options. Click Continue.
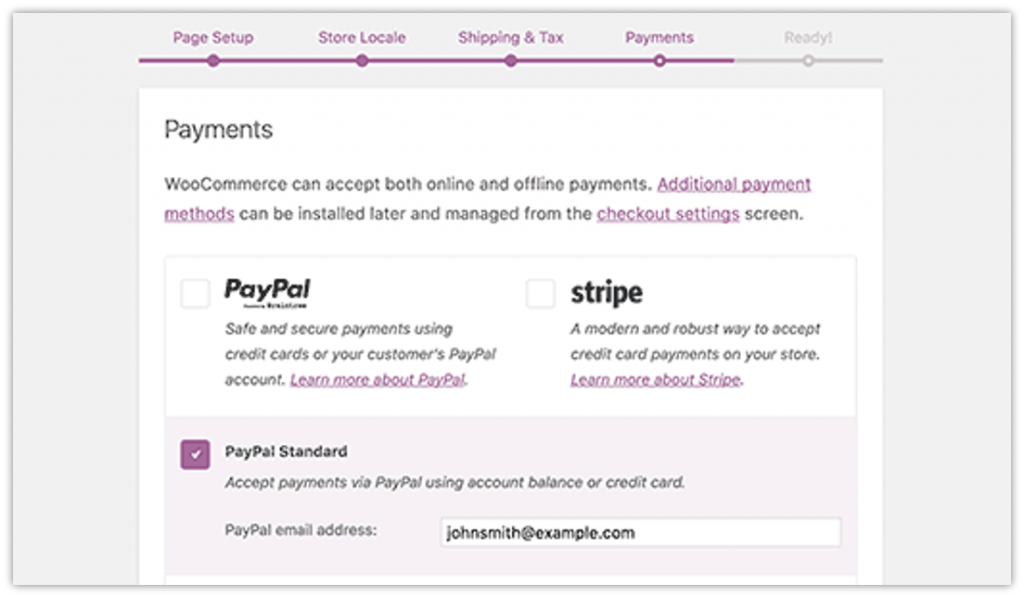
On the Payments tab, you need to choose the payment method for your online store. WooCommerce can accept both online and offline payments. The available options are – PayPal, Stripe, PayPal Standard, Check Payments, Bank Transfer (BACS) Payments, and Cash on Delivery.
PayPal Standard is the easiest way to accept payment online. Just enter your PayPal email address, and click Continue.
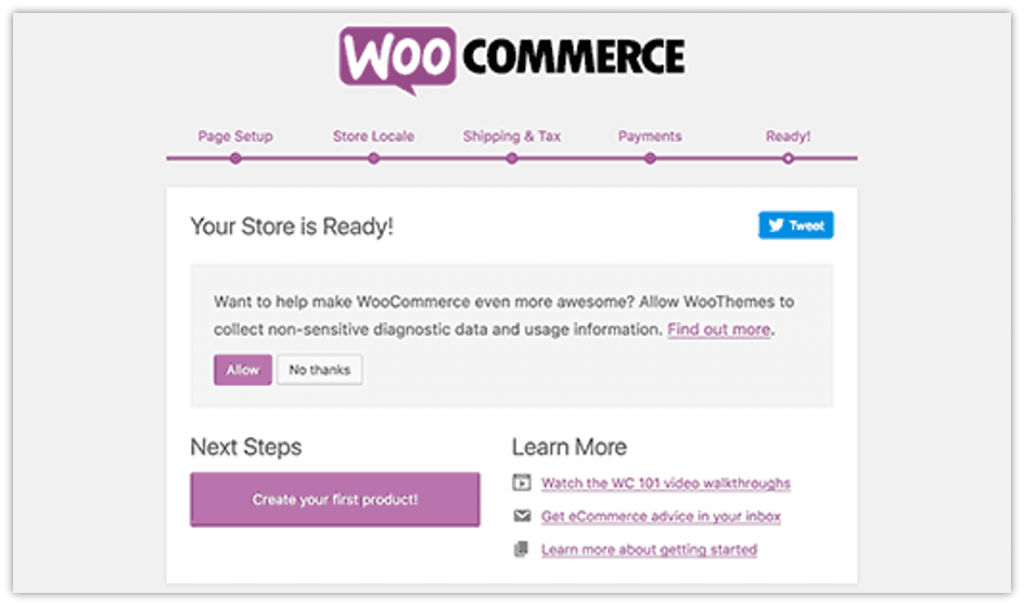
Your store is now ready! The next step would be adding products. Click the “Return to WordPress dashboard” link to exit the setup wizard.
Step 6 – Adding Products
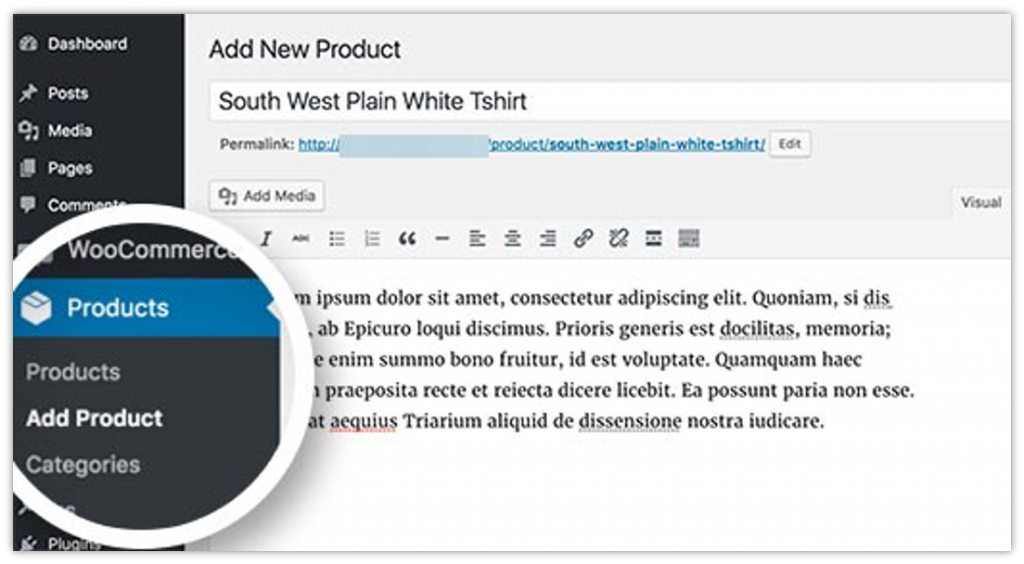
You have successfully set up the WooCommerce plugin. After that, you need to add products to your online store. On the dashboard menu, click Products and select Add Product. This will open the Add New Product screen. Enter the title of your product and a detailed description.
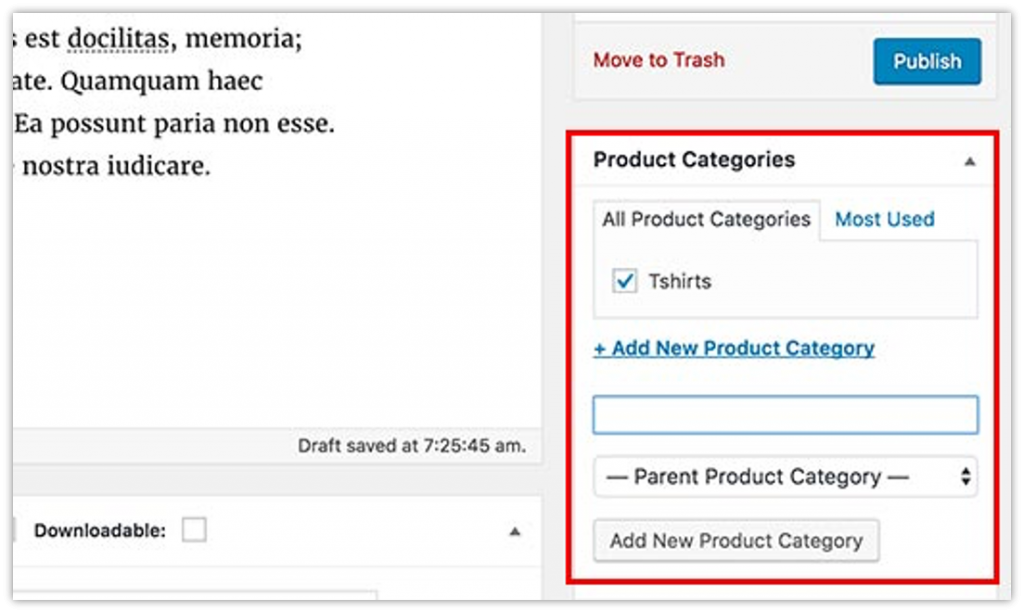
On the right side, you will see a box – Product Categories. Click Add New Product Category to create a category for the product. With product categories, you and your customers can easily sort and browse your products.
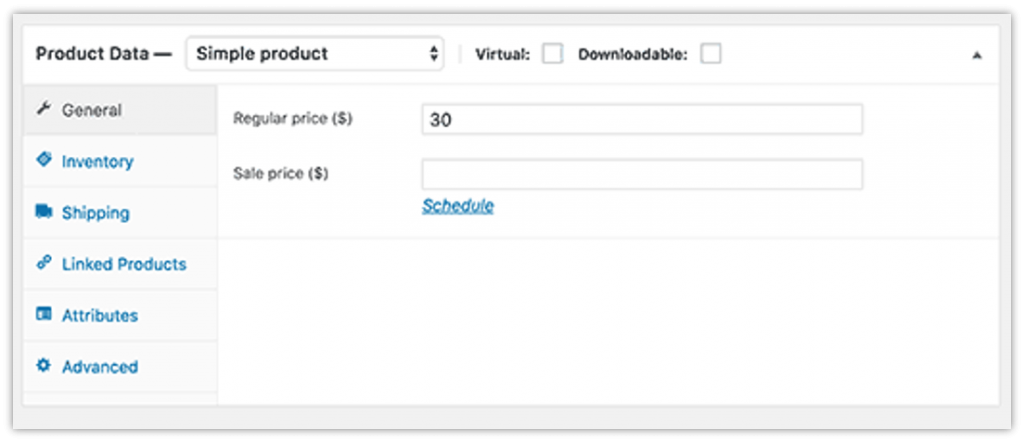
Scroll down to the Product Data section. Here you need to provide product-related information like pricing, inventory, shipping, etc.
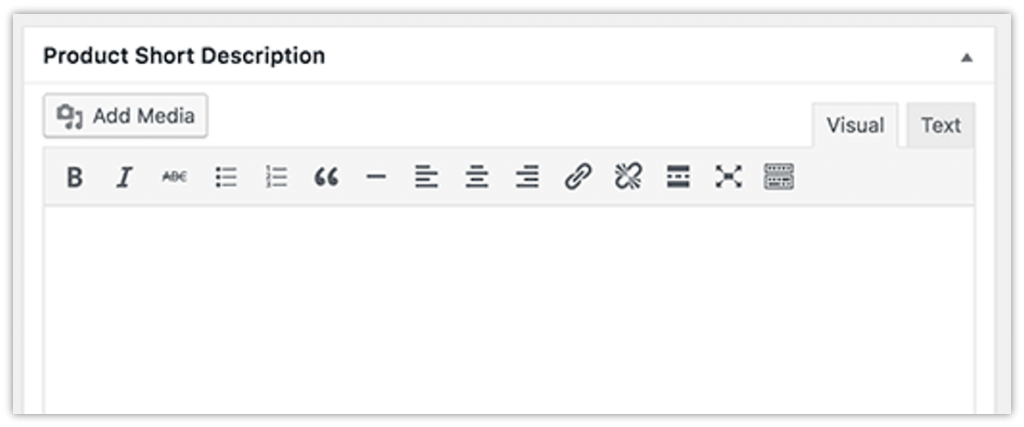
Now scroll down to the Product Short Description section. Here you need to write a short description that will be shown page when your customers view multiple products on a page.
Finally, at last, you need to add the product image and product gallery on the right-hand column.
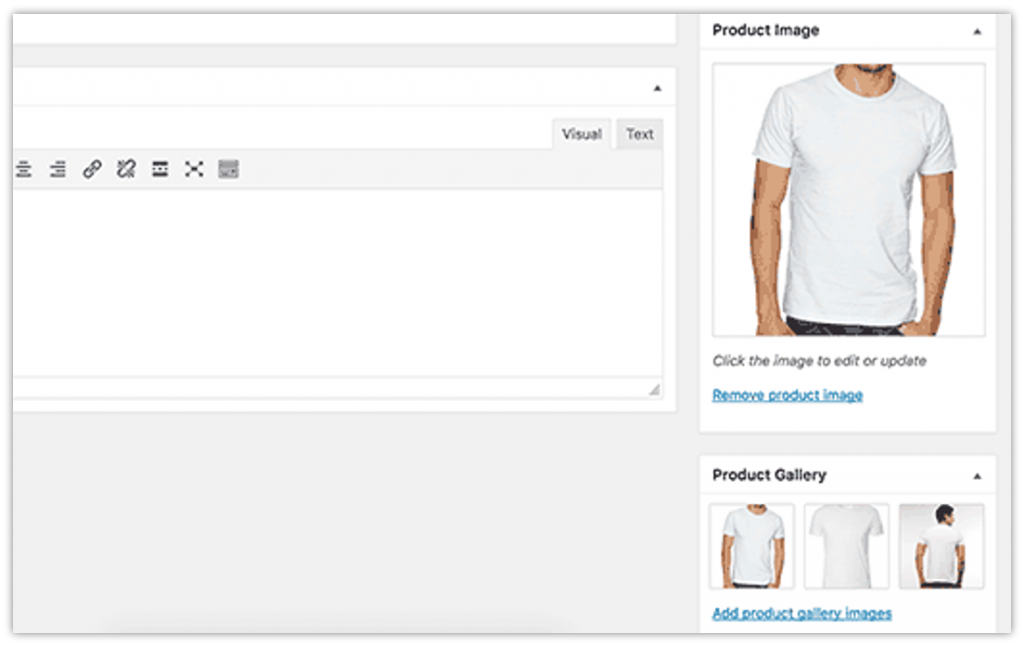
After adding the product information, click the Publish button to make the product page live on your website. You need to repeat the same steps to add more products to your website.
Step 7 – Customizing Your Website Theme
Now it is time to work on your website’s design. How your website looks to viewers is completely based on the theme you choose. So it is very important to have a beautiful and well-crafted theme for your eCommerce website. This will help you display your products in the best way possible.
The Bluehost eCommerce hosting service has a built-in theme – Storefront. It is a free eCommerce theme for your WordPress site. Developed by WooThemes, this eCommerce theme perfectly works with the WooCommerce plugin and helps you build an eCommerce website without any prior knowledge. Just like any other WordPress theme, Storefront is also highly customizable. You can easily customize the design according to your needs.
Click Appearance on the dashboard menu, and select Customize. This will open the theme customizer where you can customize the Storefront theme as per your requirement.
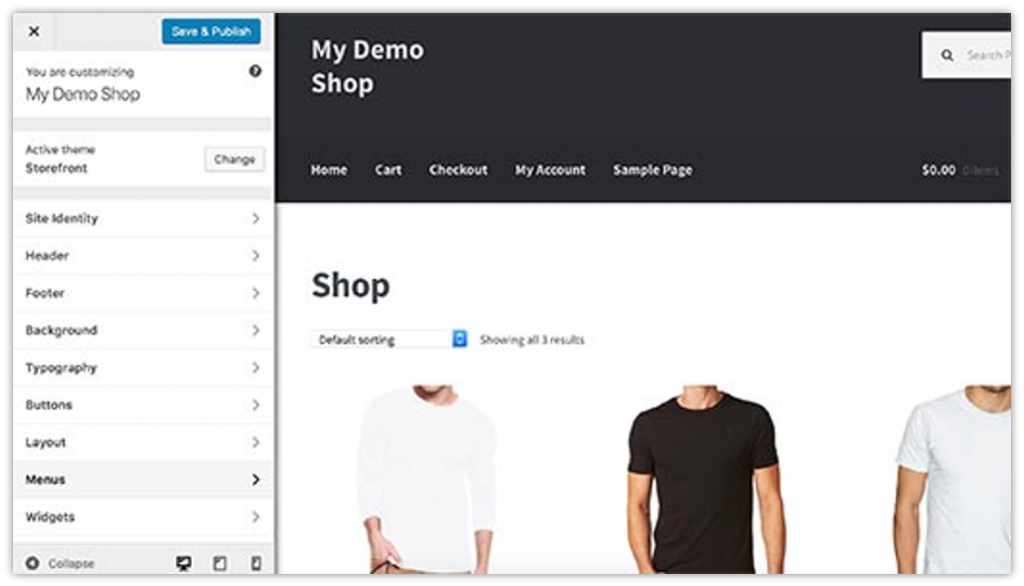
You can try out other WordPress themes if you do not like the Storefront theme. There are thousands of WordPress themes available, free ones as well as premium ones.
Click Appearance on the dashboard menu, and select Themes. This will open the themes section from where you can select or add new WordPress themes for your eCommerce website.
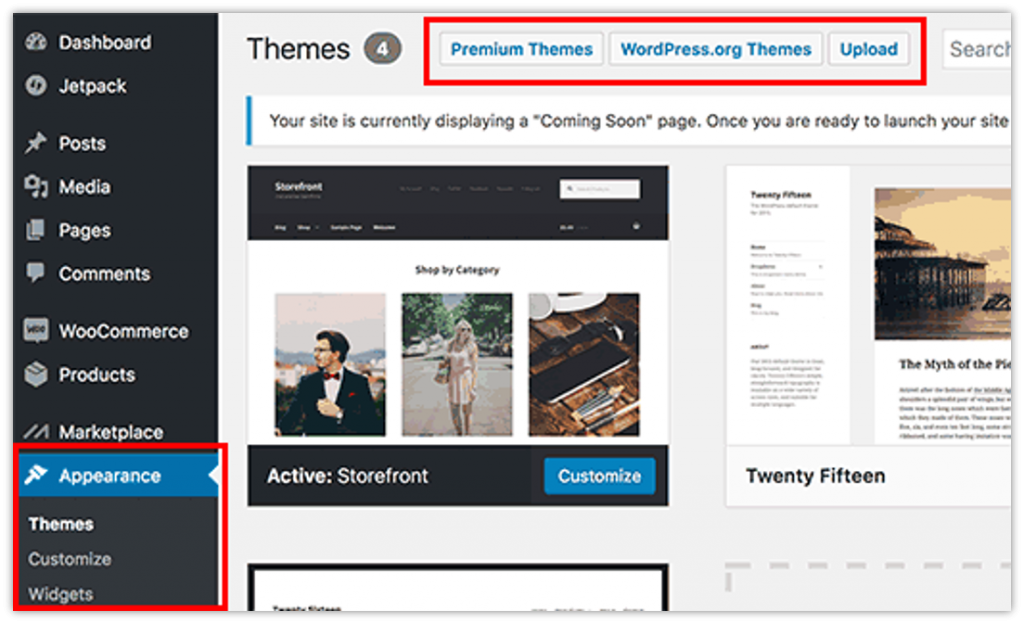
If you cannot find the best WordPress theme for your eCommerce website, we would recommend you try our Krystal Premium WordPress theme. If you would like to give your eCommerce store a premium look, this should be your pick. It is a responsive WordPress theme which means you can build an eCommerce website that will be opened on a mobile device like a smartphone or tablet.
Desktop or Laptop View

Mobile and Tablet View

Step 8 – Adding New WordPress Plugins
Your eCommerce is ready now. Before you make it live, you probably want to add some essential WordPress plugins that will enhance the user experience of your website. Generally, WordPress plugins are used to add additional features and functionality to your website.
You can refer to this article for some useful information – Free WordPress Plugins You Should Start Using Today.
Conclusion
This article has covered detailed information on how to build an eCommerce website using the WooCommerce plugin. The primary objective of this article is to help beginners start an eCommerce business without taking help from any web designer. You can now create a fully-functional online store for your business. Having an eCommerce website helps you increase your sales and revenue. Moreover, you can expand your business internationally.
It was amazing to read this informational content.